My Scan Menu
The Scan menu shows you all settings and scan destinations that the scan workflow offers (standard workflow or any other workflow).
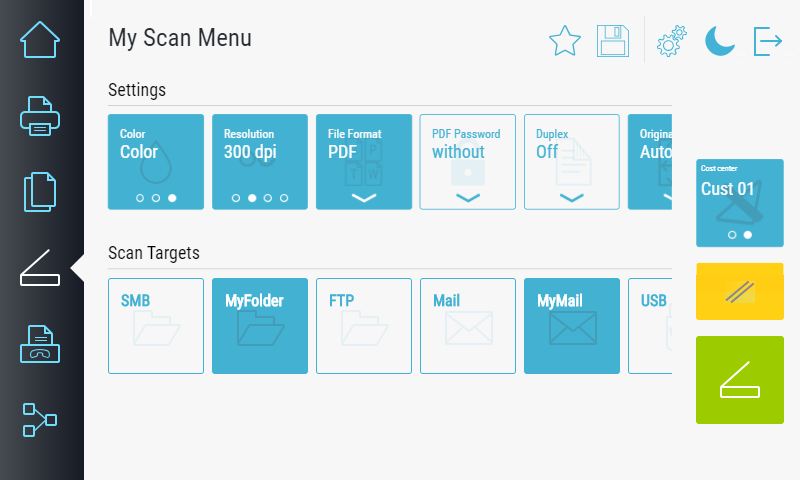
All setting options are predefined in the scan workflow - it is possible that not all settings described below will be available, see Scanning module on the device and Image enhancement module.
- Black & White: The original is scanned with black and white pixels only.
- Grayscale: The scan is performed in shades of gray.
- Color: The scan is done in full color.
The higher the value in dpi (dots per inch), the higher the quality and file size. For character recognition (OCR), low resolutions can provide better results (recommended, 200 dpi).
- 200 dpi
- 300 dpi
- 400 dpi
- 600 dpi
- JPG
- XPS
- PNG
- TIFF
- PDF - PDF file contains JPEG image with configurable compression.
- PDF (image) - PDF file contains TIF image with configurable compression.
- PDF/A (image) - PDF/A compliant file contains TIF image with configurable compression.
- hcPDF - High compression PDF.
OCR formats (non-license-free OCR formats are only selectable on the device if the device has an OCR license, see also OCR and barcode recognition)
- Portable Document Format (pdf)
- PDF TS (OCR + image) (license-free OCR with Tesseract)
- PDF/A TS (OCR + image) (license-free OCR with Tesseract)
- PDF/A (OCR only)
- PDF/A-1b (OCR only)
- PDF/A-2b (OCR only)
- PDF/A-2u (OCR only)
- PDF (OCR + image)
- PDF/A (OCR + image)
- PDF/A-1b (OCR + image)
- PDF/A-2b (OCR + image)
- PDF/A-2u (OCR + image)
- Word (doc) OCR
- Word (docx) OCR
- Excel (xls) OCR
- Excel (xlsx) OCR
- PowerPoint (ppt) OCR
- PowerPoint (pptx) OCR
- Rich Text Format (RTF) OCR
- Text (txt) OCR
- Off: Scan is one-sided.
- Long Side: The scan is double-sided, the sheet is turned over on the long side (portrait format).
- Short Side: The scan is double-sided, the sheet is turned over on the short side (landscape format).
- Book Left: A book is scanned when it is opened on the platen glass; the left side is printed on the front side, and the right side is printed on the back side.
- Book Right: A book is scanned when it is opened on the platen glass; the right side is printed on the front side, and the left side is printed on the back side.
- Auto
- A4 landscape
- A4 portrait
- A3
- A3 Wide
- A5 landscape
- A5 portrait
- A6 landscape
- A6 portrait
- B4 landscape
- B4 portrait
- B5 landscape
- B5 portrait
- C4 landscape
- C4 portrait
- User portrait *
- User landscape *
* The first user-defined format set in the device is used - only available on Kyocera and Lexmark devices (there is no difference between landscape and portrait on Kyocera devices; on Lexmark devices, the paper is rotated accordingly)
- On: After a scan from the platen glass or complete scanning of all pages in the document feeder, the device waits and asks if any further scans from the platen glass or document feeder should be made in addition to this scan. This continues until the user confirms the message with Finished.
- Off: The scan stops after a scan from the platen glass or after all pages in the document feeder are scanned.
- Off: File separation is switched off, all pages scanned together in the document feeder are stored in one file. This does not work if the file format cannot contain several pages or with any image formats (e.g. TIFF, JPG).
- Number of pages: File separation is active and saves the specified number of pages in one file (e.g. if 6 pages are scanned and 2 pages is selected, this results in 3 files with 2 pages each). B/W TIFF documents are compressed using LZW.
- Off: The function is switched off, no page combination takes place.
- On: Similar to the Combine function when copying, two pages are displayed vertically side by side on a landscape page.
- Much Brighter
- Brighter
- Somewhat Brighter
- Normal
- Somewhat Darker
- Darker
- Much Darker
- Highest quality
- Very Good Quality
- Good Quality
- Less Quality
- Acceptable Quality
This area groups rarely used image enhancement options.
- Text: Optimizes scanning for pages containing text.
- Photo: Optimizes the scanning process for pages that contain photos.
- Text + Photo: Optimizes the scanning process for pages containing text and photos.
- Do not remove: The pages remain unchanged.
- Remove: The margins of the sheet are replaced by white. This can remove the dark shadows that appear at the edges of the page during a book scan, for example. This function can only be used on white pages.
- Do not remove: The pages remain unchanged.
- Remove: Attempts are made to remove clearly visible remnants of punched holes scanned into the sheet margins, which are usually caused by shadows.
- Do not correct: The pages remain unchanged.
- Correct: An attempt is made to straighten the content of a page scanned at a slight angle. This function is always performed automatically during OCR recognition to improve the character recognition result.
- Do not remove: The pages remain unchanged.
- Remove: Blank pages are removed from the document. The paper must not be too dirty or creased, as the image processing system might detect this as desired page content.
- Do not remove: The pages remain unchanged.
- Remove: An attempt is made to detect and automatically remove white borders around the scanned image.
- Off: The pages remain unchanged.
- On: An attempt is made to fill up the border pixels of lines, thereby slightly thickening the line. This function necessarily requires the b/w format (for grayscale or color the option is ignored).
- Off: The pages remain unchanged.
- On: An attempt is made to remove the border pixels from lines, thereby making the line slightly thinner. This function necessarily requires the b/w format (for grayscale or color the option is ignored).
To get a better image enhancement result (e.g. when removing punch holes) the image can be inverted.
The inversion is done internally and is used purely for processing. The scan itself is then always output normally (i.e. not inverted). Try out which setting gives the best result for your scans.
- Auto: The system itself decides whether the processing is done with a normal or inverted image.
- Normal: The processing is done with a normal image.
- Inverse: The processing is done with an inverted image.
The pages of a scan can be rotated automatically or according to the setting.
- Auto: The system itself decides whether the image is to be rotated, e.g. to be able to display text in the correct orientation. This is decided individually for each page of a scan.
- No Rotation: No page of a scan is rotated.
- Right: All pages of a scan are rotated 90 degrees to the right, the former top is on the right in the scan.
- Bottom: All pages of a scan are rotated 180 degrees, the former top is at the bottom in the scan.
- Left: All pages of a scan are rotated 90 degrees to the left, the former top is on the left in the scan.
Pages can also be rotated already by device settings which, thereby influences the actual result.
The scan destinations are defined in the workflow. Only destinations that exist in the workflow are available. The following describes the settings under the default names, but the names can be changed in the workflow
Some scan destinations have settings that can be set or changed on the device (required fields are marked with *). In the respective scan destination module of the workflow, it is possible to make presettings and specify whether fields can be changed.
If not all required settings of the scan destination are set yet, the settings dialog opens when the destination is selected. If all settings are already set, you can open the settings dialog by pressing and holding the scan destination (long press).
For some scan destinations not all settings are visible. Swipe up and down through the settings to see all the settings.
- Directory: In this field, enter the destination directory where the final scan file should be saved. The directory must be filled with a value or stored as the default in the workflow. If the path does not exist, it will be created if possible. A UNC path (share) can be specified. For local paths, the server on which the ImageService is installed is assumed. If a default scan destination or, if a directory search is activated, a root directory is stored, the advanced menu can then only be opened by pressing the SMB module button for a longer time. If the directory search is activated, it is then here possible to select from the available subdirectories using the
 button.
- Name: The username for accessing the directory on the target server must be entered in this field.
- Password: The user's password is entered in this field (for access to the destination directory).
- File name: This field is used to specify the name that the scan file should be given.
- Append timestamp: Appends a timestamp (date + time) to the specified name to prevent a collision with existing file names.
See further information on the The Scan Destination SMB Module.
This function requires no settings. All necessary settings must already be available in the system.
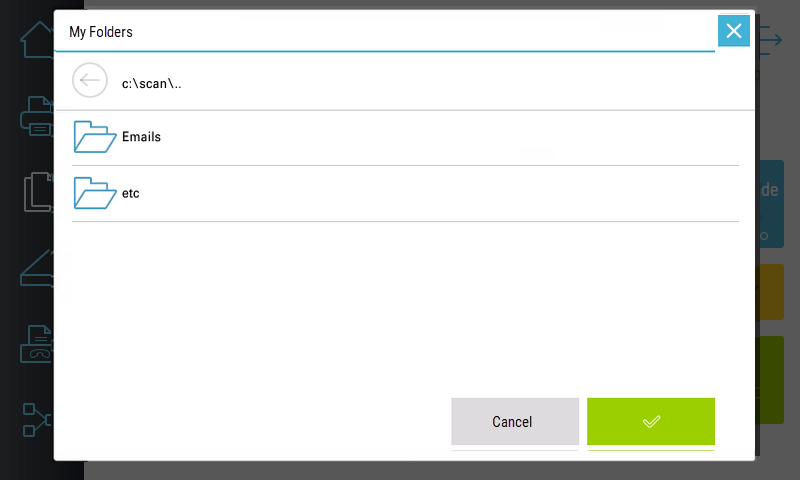
See further information on the Scan destination My Folder module.
The function is only visible if a personal folder is stored in the user data record.
To scan to OneDrive, you must first log in to your OneDrive account. Perform this login in the WebClient, see User.
- File name: This field is used to specify the name that the scan file should be given.
- Append timestamp: Appends a timestamp (date + time) to the specified name to prevent a collision with existing file names.
- Directory: This field allows a subdirectory to be entered in which the final scan file is to be saved. Subdirectories that do not exist are created (e.g. invoices\customer1)
- Directory: In this field, enter the destination directory where the final scan file should be saved. The directory must exist.
- Hostname: The hostname of the target server is entered in this field.
- Port: Enter the port number of the connection (e.g. 21 for FTP).
- Name: The username for accessing the directory on the target server must be entered in this field.
- Password: The user's password is entered in this field (for access to the destination directory).
- File name: This field is used to specify the name that the scan file should be given.
- Append timestamp: Appends a timestamp (date + time) to the specified name to prevent a collision with existing file names.
See further information on the The Scan Destination FTP Module.
- E-mail recipient: Enter the e-mail addresses to which the scan is to be sent (list separated by ;), or select one or more addresses from the address book
 .
. - E-mail CC: E-mail addresses of copy recipients (list separated with ; or select from address book ).
- E-mail BCC: E-mail addresses of blind copy recipients (list separated with ; or select from address book ).
- Subject: Enter the text to be used for the subject of the e-mail in this field.
- E-Mail text: Enter the text to be used as the e-mail text in this field. This allows you to provide the recipient with additional brief information about the scan.
- File name: This field is used to specify the name that the scan file should be given.
- Append timestamp: Appends a timestamp (date + time) to the specified name to prevent a collision with existing file names.
This scan destination is not displayed for users who do not have an e-mail address.
See further information on the The Scan Destination E-Mail Module.
This function requires no settings. All necessary settings must already be available in the system.
This scan destination is not displayed for users who do not have an e-mail address.
See further information on the Scan destination My E-Mail module.
This function requires no settings. All necessary settings must already be available in the system.
See further information on the Scan destination USB module.
The function is not available for all supported device manufacturers and model series.
 If at least two cost centers are assigned to you for billing, the Cost Center button appears. Select the cost center to which the costs of the activity are to be charged.
 Use the Reset button to discard all settings made and restore the default settings. Depending on the device, the hardware button on the device can also be used for this purpose.
 Press the Scan button to start the scanning process. Depending on the device, the hardware button on the device can also be used for this purpose.
 Mark functions as favorites by pressing the star symbol. These can be standard functions or workflows you have created yourself. They are displayed in Home screen under Favorites. If the list of favorites is longer than the screen is wide, swipe your finger horizontally over the favorites (a maximum of 20 favorites is possible). Press the star symbol again to remove the function from the favorites.
Depending on the system settings, this function might not be available.
 Use the Save button to save and edit a workflow. Workflow in this case means that all settings you have just made are saved and can be restored later with the push of a button or even executed immediately. The Save Workflow Settings dialog opens.
Depending on the system settings, this function might not be available.
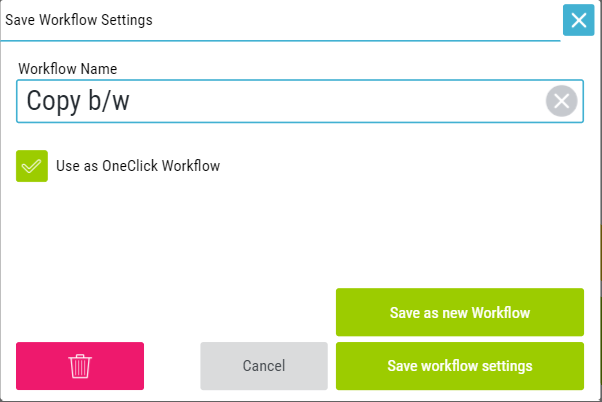
Under Workflow Name, enter a short name to appear on the button in the area My Workflows. For a workflow that already exists, you can change the name here.
Use this setting to define that a workflow will be executed directly when the button in the menu is pressed (button is displayed in green). The settings that you have previously made are used. If this indicator is not set, the dialog opens when you press the button in the menu (button is displayed in blue) and is preset with all the saved settings (you then have the option of still making changes).
Use this button to save the settings as a new workflow. In this way, you can also call up existing workflows, modify them and save them as a new workflow.
Use this button to save changed settings if you have called up an existing workflow. When creating a new workflow, this button is disabled.
 Use the Delete button to delete the workflow.
The workflow is deleted without prompting and cannot be restored.
If the original workflow is changed by the administrator, this can also affect the settings of a personal workflow (settings can be changed or omitted).
 The Settings button takes you to your personal settings, where you can set the language. With some device manufacturers, you can get there directly; with some, a menu opens which gives you to access the settings. In this menu, the status dialog of the device can also be called up using Device Status.
After logging in, the device will automatically switch to the language you have set. Depending on the system settings, you also have the option here of linking a transponder card with your user, see Card learning.
If you have the user right Use Device Function, you can close the interface of IQ4docs and go to the device interface (this is the same as the function Device Function in the Copy area, however, depending on the license of the device, the copy dialog is not always displayed).
This function is used to call up the Status device interface, in which print jobs can be viewed and paused. Technicians can also access the technician menu of the device via this menu.
If the device has to be made available with full rights for a technician, the maintenance password can be entered via this menu item, see also Unlock Device With Service Password.
If you have administrator rights to the device (see User List), you can open another dialog by pressing the Settings button for a longer time. This dialog provides you with information about the device and about the settings and versions of the Embedded Client and DeviceService. Additionally you have the following buttons:
- Save log file to USB: The IQ4docs log file is written to a USB medium plugged into the device (log_<timestamp>_<device_serial_number>.log, e.g. log_20171115_160457_W2S6801632.log). The log file can have a maximum size of 2 MB. The write operation is started immediately when the button is pressed and is also ended without a message (takes only a few seconds).
- Close application window: Closes the Embedded Client interface (displays the interface of the device).
 With some device manufacturers, pressing this icon activates the device's energy-saving mode and turns off the display. If you are currently logged in, you will be logged out by this process.
 To log out, you can press the Logout icon located in the upper right corner of each dialog. This will take you back to the default login screen (which one that is can be set under Set authentication methods).